Friday, 9 August 2024

How to install eSIM for Flexiroam network: All the debugging and failure trial & error before finally Successfully using the data for the eSIM.


Flexiroam has an online SIM and eSIM shop, with very attractive discount for local, regional and international SIM and eSIM solution. I happened to get one of the package.

I purchased the package for European one country, Lithuania, for 5 days, unlimited plan eSIM.

I use my mobile phone - iphone 13mini, browser Google Chrome to login wish a Google account, and then purchase an eSIM Lithuania 5 days unlimited plan.

Beware that you need to have a stable wifi that already exist to be able to set up your eSIM, or if you use other means of wifi, such as mobile data, roaming mobile data etc, there will be an error during set up. Check out the error part.

Initial purchase process:

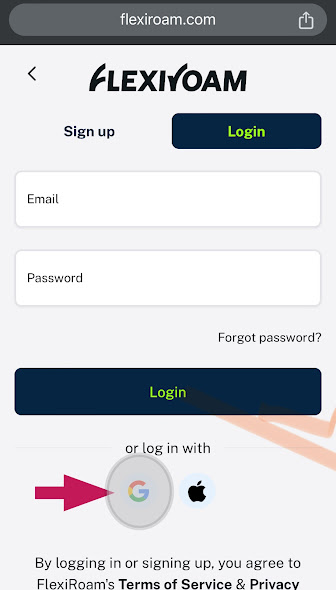
It was easy, click on the plan I wish, find a suitable Discount Code, which needed to try a few times since there is an error displayed for the first two times. I paid with Visa which is smooth. I signed up with my google mail to purchase the eSIM. 


The FlexiRoam webpage in mobile iPhone Chrome browser

The email I received payment receipt once payment is done online for the eSIM package with Visa card.

Except the above email for receipt, I didn't received another email. From the receipt I realised Hong Kong is the base of the FlexiRoam center.

Then I enter into the webpage again and login with the google email (as I had signed in to google before I purchase the eSIM. 


You may avoid signing in with Google account, reason is in the Error section below.


After login in the webpage, I found the two tabs: My Plans ; My Sims.


I copied the 13 digits number and go to my iphone, trying to activate the eSIM so that I can use the mobile data.


Steps I failed to setup iphone:


1st attempt : Failed.


1. I entered into Settings > Mobile Service > Add eSIM
2. There are two options: a. Transfer From Nearby iPhone b. Use QR Code. 

I checked my email but there is no QR Code sent to me. I only have a code of 13 digits in "My Sims".

Debugging process:

I had to trouble shoot. I checked the many social media of FlexiRoam, the FB are full of bad comments. I realised maybe the customer service isn't working well.

2nd attempt : Failed


1. I entered into Settings > Mobile Service > Add eSIM again. 

2. In the two options: a. Transfer From Nearby iPhone b. Use QR Code. I checked both and find out b. Use QR Code can also enter details manually.

3.There are page of Enter Activation Codes and asking for SM-DP+ Address, and Activation Code, Confirmation Code (Optional).


4. When I tried the 13 digits on the activation codes and put FlexiRoam as the SM-DP+ Address, it doesn't work. I tried varies combination and it still doesn't work. Thus I need more help and googling doesn't give me info about SM-DP+ Address.

3rd Attempt :

delayed answer until I solved all the problem myself. 

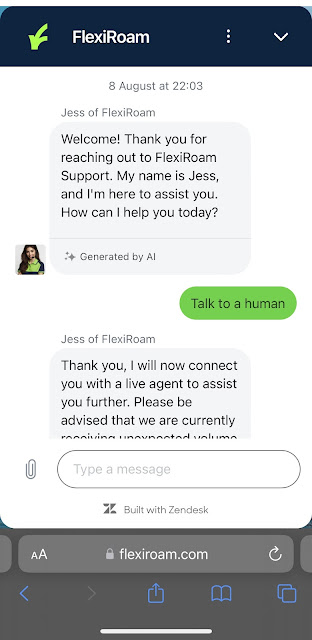
I tried to connect with the chatbot to get help on info such as SM-DP+ Address. Here are the conversation:


4th Attempt: successful

1. I rethink the entire setup process. I suspect there must be something I have not explore. I decided to download the app of FlexiRoam.

2. I search in App Store and found FlexiRoam eSIM & Data Plans app.


App of FlexiRoam

3. I login to the apps with google email. To my surprise, in the account part, I found "my SIMs" area has an "Install" button which doesn't appear in the webpage similar account after login. 


4. I clicked on the install button, this message appeared:
"Active New eSIM....." as shown below:


5. It connecting to the network provider, taking quite a while. 


6.  The new eSIM from Webbing (provider's name) is ready to activate. Then the screen shown "Activating..." and taking another while. 

7. Then the screen shown "Connecting to network..." and taking another while. 


8. As said on screen, I can continue using my iphone while eSIM is activating. Thus I continue to check the chatbot messages for reply, which nothing happened there in the chatbot.


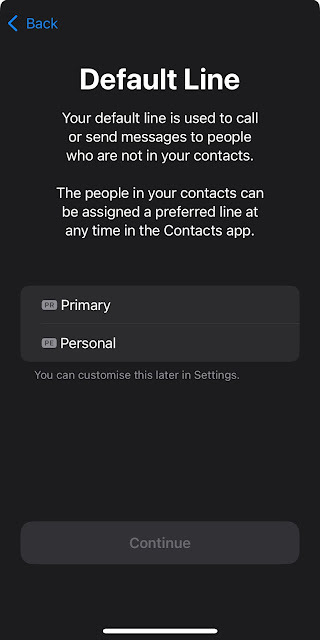
 9. Finally, in the Mobile Data screen, Default Line shown two SIM, which first one, Primary, is my existing physical SIM original in my iPhone already. Secondary or Personal is the newly installed eSIM, without physical SIM. 


10. Then choices to choose which SIM to use for iMessage and FaceTime. 


11. The process continue with "Activating..." status in Personal SIMs. Again, it took quite a while. 


12. The Webbing part is shown when I clicked into the Personal right " > " as below:


13. At one point after some hours, the below message appeared, saying that "Unable to Activate eSIM....". 


14. I tried again by pressing Install Button. And finally, the installation is successful. 


15. This is the Webbling details shown in the Mobile Data> Personal >   :


16. I am now able to use unlimited eSIM without the time and space limit as long as I am in Europe area.


Good luck for everyone who setup this eSIM, wishing all your good wishes come true and safe journey!

Error to be careful with:


1. 

Webpage sign up / login: 


Customer is allowed to click on the Google button and login with google account.


In the app, customer has no longer the choice to login with Google account. When I tried to type in the email text space and the google password, it said, login error wrong login or password.

Solution: Since I had purchased the eSIM with google login, and I need to find a way to install the eSIM into my iPhone, as the normal "add eSIM" in my iphone doesn't work. Luckily I am still login in the webpage account, I go to change password and put a password in the google account. Then I login with the gmail in the app with the new set password and it worked.


2. 

No "Install" Button in the webpage login account, while "Install" Button is in App login account.


3. Setup eSIM need to connect activation and inner setting with the browsing center called Webbing. Any unstable wifi, or roaming mobile data, or mobile data on its own will cause the setup to be halted half way or unable to setup successfully. 


Saturday, 13 May 2023

How to install Healy & MagHealy 1.0 如何安裝希利和麦希利 1.0


Installation Guide (English Version) 

安裝指南(中文版)请参考下面的视频。


How To Setup MagHealy Program 


Saturday, 7 October 2017

How To Logout All Google Sessions?

Steps on:

1. Login to your gmail.
2. Click on "details" in the end of the browser version.


3. A pop up windows will appear in the left corner of the browser.
4. Click on "Sign out all web sessions".


Sunday, 28 August 2016

MALAYSIAN # JomDaftar # For Voting in 2017

Malaysian: Please check this out! Possibly the earliest date elections could be expected is somewhere in March 2017. Please check and register for yourself, family and friends. Go to this link to check http://daftarj.spr.gov.my/DAFTARJ/DaftarjBM.aspx


If you're not listed, please take the initiative and go to Post Office to register. 3rd Quarter of 2016 - there is only 1 month and 19 days left. If Elections are held in March, 2017. Those who are registered as a voter by 30/09/2016 only will be able to vote. There have also been reports lodged by Bersih of many registered voters transferred out from their constituencies in recent By Elections in Sg Besar and Kuala Kangsar. So please do check even if u are a registered voter or have previously voted before. The future of the country begins with your first step. # JomDaftar # Send to all your friends

This will be how your result look like:


Friday, 12 August 2016

10 Steps to Setup Xiaomi Wifi Amplifier / Repeater

How To Setup Xiaomi WiFi Amplifier With Different Router

How To Setup Xiaomi WiFi Amplifier With Different Router


Xiaomi WiFi Repeater (some call it Xiaomi WiFI Amplifier), is portable, inexpensive and tiny wifi repeater device which is supported with USB power to extend the range of your WiFi network. One drawback is that (officially) Xiaomi WiFi Repeater is only compatible with Xiaomi Router product itself and there is no documentation provided by Xiaomi for “pairing” this repeater with other routers. But don’t worry we will help you in a quick and easy step by step to work this repeater with any router, here is how.
Additional information before you begin:
  • We used TP LINK TL-WR1043ND V2 as the “host” router and it worked well.
  • Set your “host” router wireless security key to WPA2-Personal, AES Encryption.
  • Make sure your “host” router is using 2.4Ghz frequency, will not work if it’s in 5Ghz frequency.
  • For making sure which frequency and what wireless security key type your router is using, please go to your router’s default gateway. Click here if you don’t know how to find it.
1. Connect your smartphone with the WiFi network that you want to Repeat/Extend (for the purpose of this tutorial we use 'TechWorld' SSID, the “host” router which will be repeated).
2. Plug in your Xiaomi WiFi Repeater to any USB Port (USB charger, powerbank or anything that has USB port).


3. Download Mi Home application on Android Play Store or iOS App Store
4. After you have downloaded the app, open the Mi Home application. You must be logged in with Mi Account first before you begin “pairing” with your router. Create new account if you don’t have one. Before you tap on the login button, please make sure the server you choose is (“Chinese Mainland”).


Do not choose other servers other than “Chinese Mainland” because it will display different layout and pairing will not work !!!
For iOS devices, choose like below screenshot


For Android devices, choose the first option from the list
If you already chose a server that is not Chinese Mainland, Re-Install or Clear Data Mi Home via App Manager on the Android Settings. Then open Mi Home app again.


5. Tap on “Devices” tab on the bottom left of your screen and then tap on the “+” button on the top right of your screen.


6. After tapping the “+” button in step 5, you will see a list of Xiaomi Home products. Select on Mi Wifi Repeater and make sure your repeater’s light status is blinking in yellow color then tap on the circle box beside the text “Yellow flashing light” and tap Next.


7. You will be brought to “Choose working Wi-Fi” window, since you have connected to the “host” router stated in the first step, “host” router’s SSID will automatically be inputted. You just need to input the “host” router’s password and press Next.


8. After pressing Next button, you will see your screen like below. Exit Mi Home and go to your phone’s wifi setting and connect it to”xiaomi-repeater_xxx”. Then go back to Mi Home application.


9. After opening back Mi Home application, Mi Home will automatically detect that you have connected to Xiaomi wifi repeater. There will be progress screen in percentage. Wait until it’s done and see that your repeater’s status light turning into blue color which mean that it has successfully paired/connected to the “host” router.


10.  After finished “pairing”, you can change the device name (helps you to differentiate if you have more than one repeater).


If at 100% displays an error but the router’s status light has turned into blue color, just ignore this message. Go back to “Devices” tab and you’ll see that your Xiaomi repeater is on the list.


Xiaomi WiFi amplifier/repeater’s SSID cannot be changed. Your repeater SSID will have additional “_plus” (e.g. TechWorld_plus) with the same password with your “host” router.

If there is a connection error, you may follow the instruction accordingly to fix the problem.


I hope this tutorial helps your trouble connecting Xiaomi WiFi amplifier/repeater to your third-party router. If you have questions or concerns about this tutorial, post a comment below this article. Have a nice day!